Supported Channels
As part of your Teams provisioning, channels can be added to your Team at the provisioning stage or from actions after creation, choose from:
- Standard channels - available to all members of the Team
- Private channels - available to a specific group of people within the Team.
- Shared channels - available to a specific group of people from your tenant or other tenants
Channel Templates
Create a Channel template, to define the name, channel type, membership (private & shared only) and which apps will be included in the configuration.
Then, choose if they will be created when a request is made or if they can be added via the 'Create Channel Action' action later.
The General channel will always be created and cannot be removed as designed by Microsoft, the tabs can be amended within it.
The default tabs will be added by default by Microsoft (Notes, Shared (Files))
The steps below show how to create a channel template and the options available, for Shared or Private channels there are some additional options.
- Go to Admin > Service Definitions > Channels
If you do not see the Channels tab please check your service type is set to Microsoft Teams in the Overview Tab. - Click + New Channel
-
Complete the Channel information:
| Property |
Description
|
|
|
Display Name
|
- This will be the name of the Channel, transform tags can be used to populate the name. For example, add {Project Number} column values to the name of each channel
- The name of the Channel will also be the name of the folder in SharePoint, there are some characters that are not supported in the name: (~#%&*{}+/\:<>?|’”..) also will be limited to 50 characters
|
|
|
Description
|
A description of the channel can be added, this will be visible if used in the 'Create a Channel' action. There is a limit of 1024 characters for the description.
|
|
Icon
|
An Icon can be selected from the list provided and will be displayed in Teams
|
|
Privacy
|
Select the type of channel that will be created:
- Standard
- Private - must contain 1 owner or member of the Team. If a member is not part of the Team they can be added when configured.
- For example, an area for the Manager and Supervisor of a departmental Team or the Project and Business Owners of a Project Team.
- Shared - must contain 1 owner that is already an owner of the Team. Additional configuration is required to share externally.
- For example, A Channel to discuss and share documents with 3rd party people or other companies that are involved with the project.
|
|
Members
|
- This will only be displayed if private or shared channels are selected.
- Use the {Members}, {Owners} or people picker columns {Project Owner} to define who will be added at the point of creation.
- To add All Owners, Use {Owners.All} or for custom columns that allow more than 1 person {Project Owners.All}
|
|
Enable Channel Email address
|
- Every Channel gets allocated an email address once the Owner has accessed the channel.
- If the owner is unlikely to login (set to the Service Account) then selecting this option will allow your members to access the email address.
- This is not supported in private and shared channels.
|
|
Messages
|
- Create messages that will be added to the channel and the priority they can have.
- For Private and Shared channels it is good practice to add the type to the first message, for Shared channels you can highlight you are the host of the channel.
|
|
Enable for create instance Action*
|
- When set to Yes, the channel will be created once the Team has been created, immediately as part of the request for the Team.
- When set to No, this will only be available as a template, but will not be created with the Team
|
|
Enable for create channel Action*
|
- When set to Yes, this will be a template that can be selected in the action 'Create a Channel'
- Actions can only be selected once the Team has been successfully created.
- When set to No, It will not be available for use in the Create a Channel Action, the action must be enabled for this to be used
- Read article for more information.
|
*Note: If both create for instance and channel action are set to no this channel will be ignored
4. Click Save, a summary of the Channel will be shown
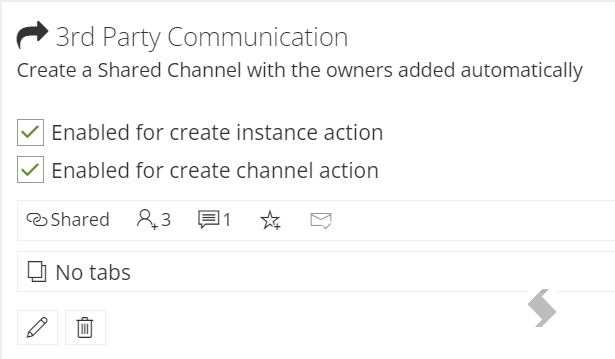
6. Save the Service Definition.
Note: If you have configured to use the channel in the create a channel action, remember to enable the action as well
- One of the owners of the Team must be an owner/member of the channel.
- For Private Channels at least one member must also be added.
- To populate the channel membership either add the
- Default UPN of each person
- Use the built-in transform tags, {Requestor}, {Owners}, {Members} or the columns used on the request form {Site Owner} .
Adding .All will pull through multiple people {Owners.All}, if not used the first person will be added.
Owners.All can only be used if you manage ownership via requestors, if you use request form fields use the column instead {Site Owners.All}
Sharing a Channel
We recommend sharing your Channel natively in Microsoft Teams. From here you can share with an entire Team internally or externally.
This is preferred to sharing with individuals as this will ensure any changes to the Team you share with being passed through to your shared channel without manual interventions.
If you do plan to share externally, you must make sure that all Azure AD setup is complete in your tenant and the company you plan to share with. For more information read about
Shared Channels from Microsoft
Edit your channel to change any of the configurations shown above
Changes will only affect any future requests, all existing Teams will remain as they are.
- To edit the channel click

- To delete the channel click

- Save the Service Definition
Tabs can be added to any of the Channels once they are saved, click 'No tabs' on new Channels to add them.
Wikis, apps and bots, and scheduled channel meetings aren't supported at this time in Private Channels