What are PnP Templates?
PnP stands for Patterns & Practices, and PnP templates are part of the PnP Provisioning Framework, an open-source initiative supported by Microsoft and the community.
These templates allow administrators and developers to standardize and automate the setup of SharePoint sites, including team sites, communication sites, hub sites.
Expand to learn more
Each PnP template is typically a .pnp file, which is essentially an OpenXML package containing all the necessary configuration and content to deploy a site.
Templates can also exist in XML format, which is what ProvisionPoint currently supports.
Inside the template, you define
- Lists,
- Libraries,
- Pages,
- Themes,
- Columns,
- Content Types,
- Navigation,
- Additional Admins, Owners, Members or Visitors,
- Layout of Home pages,
- and other artifacts, along with their properties and relationships
Templates are applied using the PnP Provisioning Engine once ProvisionPoint has created the Group, Team and Site.
A Standard PnP template applied via PowerShell will also create the Site, as ProvisionPoint will do this your PnP only needs to include the custom elements you want to apply.
What Version is supported in ProvisionPoint
ProvisionPoint currently supports version 201909.
Useful help about what can be included in the PnP can be found below:
Create a PnP Template
A PnP template can be created manually, however we recommend creating a Site that will be a template.
This can be extracted and used to ensure you get the desired results.
Microsoft PowerShell 7 allows you to export a PnP Template, expand to see how to export a PnP
You MUST:
- Be a Site Admin or Global Admin
- Install the PnP.PowerShell module using the command: Install-Module PnP.PowerShell
- There are some new enforcements from Microsoft that will impact using -Interactive to connect,
please read: Register an Entra ID Application to use with PnP PowerShell | PnP PowerShell to ensure you can connect and get the PnP templates when needed.
Once Installed,
- Connect to PnP Online and add the template Site Url
- Extract the content
- Choose the location & filename.xml
- Set the Schema to be used
- Include pages to customise the Home page or other page layouts
- For Classic Sites you may need to use -IncludeAllPages instead of clientsidepages
More options can be found in Github: https://pnp.github.io/powershell/cmdlets/Connect-PnPOnline.html & https://pnp.github.io/powershell/cmdlets/Get-PnPSiteTemplate.html
Connect-PnPOnline -Url "https://YourTenant.sharepoint.com/sites/TemplateSite""
Get-PnPSiteTemplate -Out C:\PnPTemplate.xml -Schema V201909 -IncludeAllClientSidePages
Once Extracted, please remove any defaults like creating the default Document Libraries, unless you have custom configuration within it.
- Documents
- Standard Documents Library, remove Views if they are they standard views, leave any custom views
- Form Templates
- Site Assets
- SitePages
- Site Settings (Deprecated)
PnP Customization is not covered in our standard support, we recommend using your onboarding time or purchasing time with us to review the PnP exported with us, there will be some elements ProvisionPoint will do automatically in our provisioning process.
If you have Premium Support this can be used towards PnP customisations.
If you would like assistance with PnP templates from our experts, please discuss your requirements with your account manager.
PnP Template Structure
PnP Structure is defined by the Schema and must be setup in the correct order or you will get a PnP version failure
<pnp:Provisioning xmlns:pnp="http://schemas.dev.office.com/PnP/2019/09/ProvisioningSchema">;
  <pnp:Preferences Generator="PnP.Framework, Version=1.11.2.0, Culture=neutral, PublicKeyToken=0d501f89f11b748c" />
  <pnp:Templates ID="CONTAINER-TEMPLATE-3B78478DF69F40BB855C607FA37DB8C0">
    <pnp:ProvisioningTemplate ID="TEMPLATE-3B78478DF69F40BB855C607FA37DB8C0" Version="1" BaseSiteTemplate="GROUP#0" Scope="RootSite">
      [Add Additional elements]
    </pnp:ProvisioningTemplate>
  </pnp:Templates>
</pnp:Provisioning>
Upload a PnP Template
To upload a template, go to Admin > Resources > PnP Provisioning Templates, all uploaded PnP templates will be listed, with the option to download an existing template, if changes are required.

At the bottom of the list will be the option to upload a new template:
- Enter a friendly name for the template
- Add an optional description.
- Select the relevant file by using the 'Choose File' option or drag a file on to the area.
-
Make sure the correct value is entered for the Base Template, expand to see options
- STS#3 = Team Site no Group
- GROUP#0 = Modern Team Site (M365 Group) or Microsoft Team
- SITEPAGEPUBLISHING#0 = Communication Site
- STS#0 = Classic Team Site

- Click Add.
-
If you will be adding files with the PnP, more steps will be required to link them, expand to see the setup
- Click the folder icon, to define the folder path and the file that will be added to the Site when the template is applied,
In our example, this will be the "SiteAssets" folder with a filename of "GroupLogo.png - Add the folder structure, add the folder and type the name "SiteAssets" no spaces!!
- Click the tick to confirm
- Repeat this as many times as needed to get the folder path correct.
- In the final folder select the upload icon and choose the file that will be used.
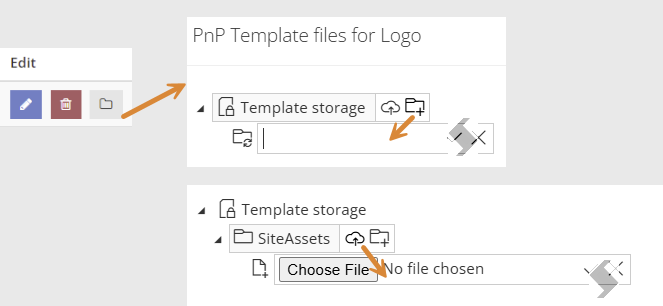
- Click the tick to confrm
- Click 'Close'
The file name and folder path should match what is in the PnP template or it will error.
Link the PnP template to Service Definition(s)
The PnP template is now uploaded into ProvisionPoint and can be assigned to an Service Definitions.
- Go to Admin > Service Definitions > Overview tab > Creation Details section.
- For Site Collections, set the 'Template type' to PnP Provisioning Template
- Then select the provisioning template from the list of stored PnP's
- For all others just select the provisioning template from the list of stored PnP's
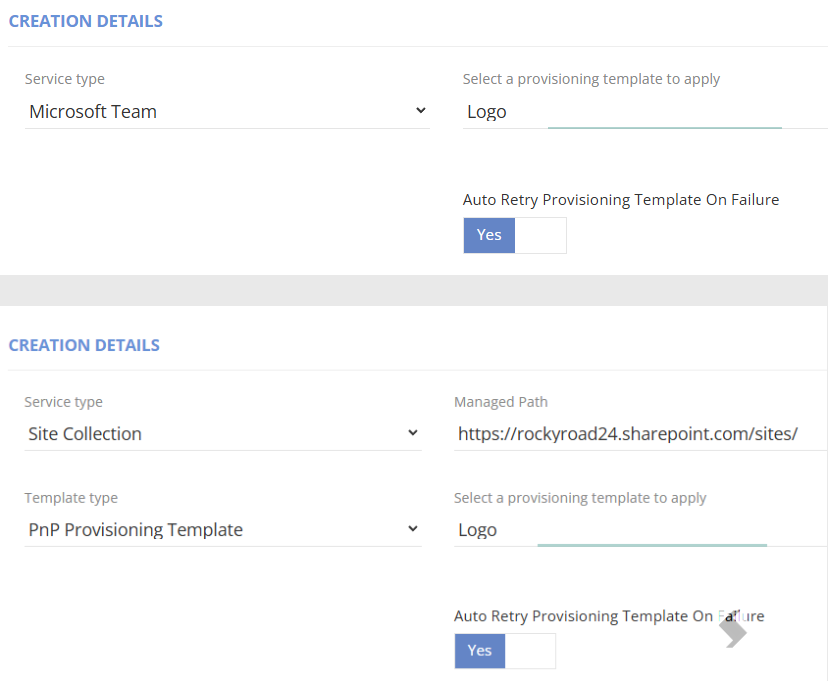
- There is an option to retry the PnP if provisioning fails due to the PnP template. Turn on if you see errors that are resolved by a replay.
- Save the Service Definition
When a new creation request is processed the PnP will be applied after all other Team/Group/Site settings.
If the PnP fails to apply something the job will fail at this point and pause the creation. Review the Job queue to see the cause of the failure
A Range of PnP examples are available for Download PnP Template Examples