Configure a Lifecyle to M365 Workspaces
A common issue in Microsoft 365 environments is trying to keep the information relevant and not allowing dead content to be kept forever.
Use Lifecycle to set unique expiry dates to your creations.
Apply unique Lifecycle policies to your 'Service Definitions', the lifecycle will be applied to any creations or imports into our app.
To configure lifecycles, ask yourself the following questions:
- When should the workspace expire?
- 90 days, depends on the type, I want the requestor to set the date...
- Should reminder notification emails be sent before the expiry is reached? If yes, to who and when?
- 1 week before the expiry the owners should get notified...
- What should happen when the expiry date is reached?
- Archive the Team, lock the Site, delete the Site, notify the IT admins and owners...
- Should the expiry date be overwritten or changed? If yes, by who and for how long?
- Allow the same length to be applied again, allow the owners to choose the date...
- Owners, IT Admins, ProvisionPoint Admins...
- Should there be multiple stages to the lifecycle? If yes, what are the stages and when should they be run?
- Archive Team, wait 30 days and delete
- Lock the Site, wait 60 days and delete
The answers will determine how to configure the Lifecycle Policies in ProvisionPoint.
What is the difference between a Lease and Lifecycle?
| Lease | Lifecycle |
| Only available if a lease was already configured | Available to new & existing service definitions |
Sets expiry date via:
- number picker
- date picker
- request variable
- lookup columns | Sets expiry date via:
- number picker
- date picker
- request variable
- lookup columns |
| Send reminder emails before expiry date | Send reminders before each stage and notifications when each action is run |
| Single stage, run expiry actions | Multiple stages with additional lifecycle actions |
| Countdown & Stages shown in Directory info page |
Once a lifecycle has been configured the Lease tab will no longer be available.
A lease/lifecycle is the length of time from the creation/start date until the expiry date. When a Team/Site/Group is created or imported into the app, a lifecycle is applied and the lease countdown begins.
The expiry date can be viewed in the Directory > Info screen for each workspace.
There is also a Lifecycle screen that will show:
- The stages that are due to be run or have already been run.
- Any updates the actions make
- Email reminders.
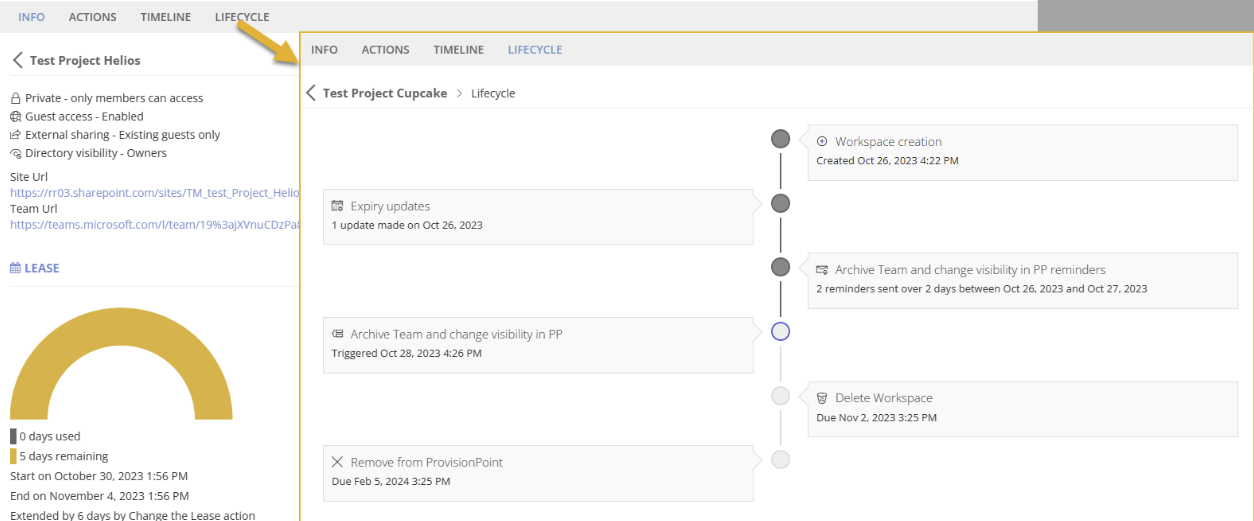
Each Service Definition's lifecycle can be unique, giving a range of flexibility not seen in 'Group Expiration Policies' in Microsoft.
Based on the answers you gave earlier, you can design and build your lifecycle policies and stages.
If you already have a Lease, this can be turned off and a replacement Lifecycle applied. Before you apply lifecycle to existing service definitions, we recommend reading our best practice guide here:
Once a Lease is disabled it will be removed from the Service Definition permanently
First, you must create the stages you would like to use for your lifecycle policies. The following Actions can be applied as well as any custom actions you have created in Admin > Templates > Custom Actions
'Change Archive State' will run native archiving for Teams and will lock SharePoint sites for members.
'Move to archived view' refers to ProvisionPoint's Directory only
The video below will show you how to configure stages:
Configuring Lifecycle policies
Please watch some of the videos below to see how to configure policies for different scenarios. The policy will configure the expiry date as well as the stages to run and the reminders to be sent.
Using a defined number of days
Using Request variables to calculate the date from Now
Using a lookup to choose from a selection