What is a Custom Service Type
A Custom Service Type is an extensibility feature in ProvisionPoint that allows you to provision and manage any type of Microsoft 365 or custom resource beyond the standard supported service types (M365 Groups, Site Collections, Teams, Planner Plans and Vive Engage Communities).
Custom Service Types use webhooks to communicate with external systems, enabling you to integrate with any custom provisioning logic via Power Automate Flows, Azure Runbooks or PowerShell Scripts.
How it works
Custom Service Types extend ProvisionPoint's provisioning capabilities through a webhook-based architecture.
- External Configuration: Create a PowerAutomate Flow, Azure function or runbook, or any other resource that will create a webhook Url as the trigger
- ProvisionPoint Configuration: App Managers define Custom Service Types in ProvisionPoint with the external webhook URL as the endpoint
- Service Definition: Service Definitions can be configured to use Custom Service Types instead of standard M365 Service Types
- Provisioning: When a user requests a Service Definition, ProvisionPoint sends provisioning data to your webhook
- External Processing: Your Flow, Runbook or script processed the request and creates the resource
- Response: Your system responds back to ProvisionPoint API with status and resource details
Use Cases
Custom Service Types are ideal for:
- Exchange Resources - provision shared mailboxes or distribution list
- User Provisioning - create guest users, external users or service accounts
- Azure Resources - provision Azure AD groups, app registrations or resource groups, security groups
- And much more...
What's not included
When using a Custom Service Type, standard M365 configuration options are not available:
- Provisioning templates
- Storage and resource settings
- Hub site associations
- Privacy Settings (Public/Private)
- Guest access and external sharing
- Security & permission levels
- M365 specific actions (Update details, Create Planner Plan, Change URL etc)
- Classification and sensitivity labels
- Group Settings
- Teams Settings and Channels
- Lists
These settings are not applicable because ProvisionPoint doesn't directly manage the provisioned resource - your external system does.
Getting Started - Setup
This guide walks you through creating, editing and managing Custom Service Types in ProvisionPoint.
Pre-requisites:
- An App Manager within ProvisionPoint
- A webhook endpoint URL (from Power Automate, Azure runbook, or custom script)
- Understanding of webhooks and HTTP requests
- An App Registration with the ProvisionPoint API setup (Only for responses)
Create a Custom Service Type
- Go to Admin > Templates > Custom Service Types
- Click + New custom service type
- Configure the following
- Name - the display name for your Custom Service Type, this appears in the Service Definition configuration dropdown.
- Description - optional. Provide a description about what the Custom Service Type does.
- Icon - upload a custom icon to represent the Service Type. The icon appears in the directory alongside provisioned instances.
- Webhook url - the endpoint that will receive provisioning requests.
- Wait for acknowledgement - optional. Use this when you need to validate the request before processing. If enabled and no response is received within 10 seconds, the provisioning request will be marked as failed.
- Wait for response - Recommended. Use this to get a completed successfully or failed option
- An additional 'Response time limit' will be displayed. Set the time to auto fail the request.
- Read Configure the API response for Custom Actions or Service Types
- Save the Custom Service Type
- Repeat for any others you want to create
If neither wait for acknowledgment or response is used, all requests will be displayed as successfully completed, regardless of the outcome in your external configuration.
We recommend using our API to send a response back if the item fails or completed via wait for response.
Use in a Service Definition
-
Navigate to Admin > Templates > Service Definitions.
-
Click New Service Definition.
-
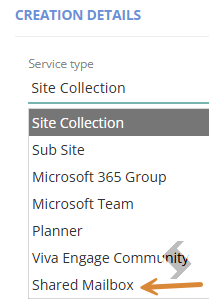
Under
Creation details and in the
Service Type dropdown, select your Custom Service Type e.g. Shared Mailbox
-
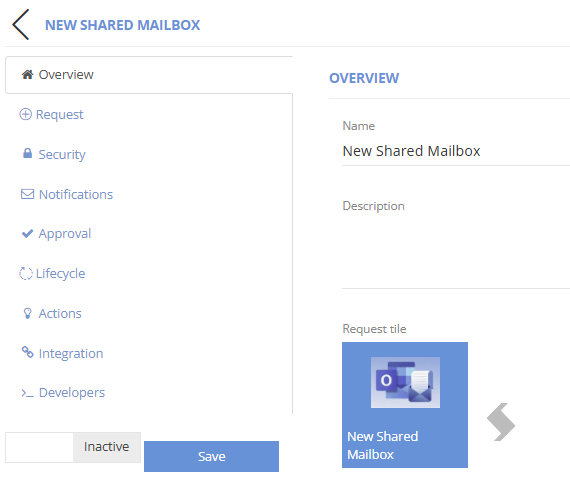
Configure the rest of the tabs as needed:
- Name, description and Tile for the request
- Who can request the new service type (Requestors)
- Naming Conventions
- Additional Metadata
- User Agreements
- Approvals
- Lifecycle Policies and Actions (you can create Custom Actions to edit or delete items)
- Integration to pass the data to SharePoint Sites
- Setup Notifications for Creation and Approvals
- Manage who will see the items in the ProvisionPoint Directory
- Save the Service Definition. We recommend submitting a test request to monitor the webhook logs and verify the resource creation.
Edit an existing Custom Service Type
- On the Custom Service Types screen, locate the Service Type you want to edit.
- Click on the Edit button (pencil icon).
- Make your changes in the form.
- Click Save to apply the changes.
Note: Changes to a Custom Service Type affect all Service Definitions using that type and the provisioned Service Instances going forward. Existing Service Instances are not affected.
Delete a Custom Service Type
Warning: Deleting a Custom Service Type will mean that Service Definitions using the Service Type will no longer function correctly. Existing Service Instances will remain in the Directory.
- On the Custom Service Types screen, locate the Service Type you want to delete.
- Click the Delete button (bin icon).
- A confirmation dialog will appear. Click Yes to confirm deletion.
- The Custom Service Type is marked as deleted and removed from the list.